
| 
| 
| 
|
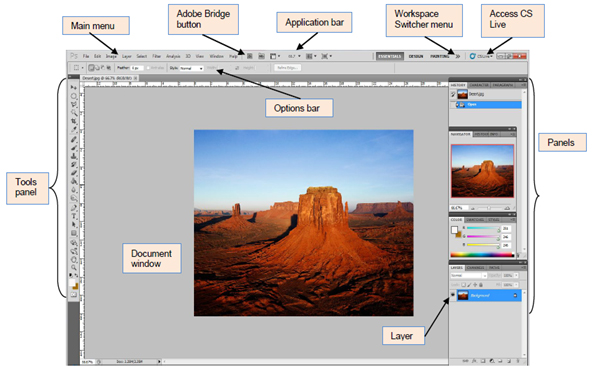
Different parts of the Adobe Photoshop This tool is used to move selected area of an image and to move layer. You can move a image or a part of image to another image by dragging with Move Tool. In order to move a selected area, click on the selection hold it down, then drag it to the desired location. We use this tool make selection on any image in rectangular shape. If you want to constrain the selection to perfect square shape, just hold the ‘shift’ key while selecting. It is used to create freehand selections. To make a selection, click on the Lasso tool , then click on where you want to start your selection and draw your desired selection while holding your mouse’s left button. To complete your selection, just release the button. Or go to the begging point. This tool select area based color range, wherever you click. In the Options Bar at the top, you can change the tolerance to make your selections more/less precise. Because Tolerance is responsible for the sensitivity of the tool. The Crop Tool works similarly to the Rectangular Marquee tool . The difference is you make any size of your image by this tool by putting image size on the option bar.. In the Option bar, you can define the target image’s size. Just fill in the Width, Height and its Resolution fields. The Crop Tool enables you to cut out a specific area by discarding or deleting everything outside the selection. This is used mostly used for create slices and website designing.It’s kind of an advanced tool. The Slice Tool lets you to cut images into smaller pieces which fit together. This tool is under the same group with the Crop Tool. This is very useful Tool..It can repair scratches and specs on images. First choose your cursor size, then holding the ‘Alt’ key, select nice/clean area of your image. Let go of the Alt key and paint over the damaged area. It copies the info from the first area to the second. It’s a very useful tool to create brush strokes to make make your own Photoshop brushes to create your custom art. Basically it is used for painting purposes.. It paints on your image, in whatever color and size you select. This tool is very similar to the Healing Brush Tool ..To select the area you want to clone, hold “ALT” and click the area, where you want the clone to be.This tool is used to create or replace the copy an area of an image. The History Brush tool paints with the information from whatever History state is selected.This tool is used to give an image a painting effect.The History Brush tool paints a copy of the selected state or snapshot into the existing image. The Eraser tool erases pixels and restores parts of an image to a previously saved state. If you are on background, it will erase the image on transparent layer.. Basically it is used to Erase mistakes on the selected layer. This tool is used to mixed colors you can say it ‘blending of color‘. It creates straight-line, radial, angle, reflected, and diamond shape blends between different colors.The gradient tools create straight-line, radial, angle, reflected, and diamond blends between colors.
Dodge Tool (O):
You can use this to make a gradiation of colors. Gradiation doesn’t appear to be a word, but it makes sense anyway. It creates a blending of your foreground color and background color when you click and drag it. Like a gradient. The Blur tool is cool. It makes things blurry. Click and drag to make things blurry. The more you click and drag, the blurrier things get. This tool isn’t as crappy as the car brand. It’s actually used to lighten whatever area you use it on. As long as it is not absolute black. Absolute black won’t lighten. You use this tool when working with paths. Since this is all about the basics, I won’t go into details. It’s related to the Pen Tool (see below) though. It makes type. Or text. Or whatever you want to call it. You can click a single point, and start typing right away. Or you can click and drag to make a bounding box of where your text/type goes. There’s a lot of options for the Type Tool. Just play around, it’s fairly straight-forward. I mentioned this tool above. It’s for creating paths, in which you would use the Path Selection Tool to select the path. Paths can be used in a few different ways, mostly to create clipping paths, or to create selections. You use the tool by clicking to add a point. If you click and drag, it will change the shape of your path, allowing you to bend and shape the path for accurate selections and such. By default it draws a Shape Layer in the form of a rectangle. It fills the rectangle with whatever foreground color you have selected. It’s pretty complicated, don’t hurt yourself with this one. Like post-it notes, but digital. You can use this tool to add small little note boxes to your image. These are useful if you’re very forgetful or if you’re sharing your Photoshop file with someone else. I’m pretty sure it only works with .PSD files. This tool works by changing your foreground color to whatever color you click on. Holding the [Alt] key will change your background color. You can really make short work of your job with the Hand Tool. It’s for moving your entire image within a window. So if you’re zoomed in and your image area is larger than the window, you can use the Hand Tool to navigate around your image. Just click and drag. You can get to this tool at any time when using any other tool by pressing and holding the [Spacebar].
Zoom Tool (Z):
Pretty obvious what this tool does. It allows you to zoom into your image. Don’t be dumb, it doesn’t actually change the size of your image. Hold the [Alt] key to zoom out. Holding the [Shift] key will zoom all of the windows you have open at the same time. Double-click on the Zoom Tool in the palette to go back to 100% view. These are your color boxes. Foreground (in the front) and Background (in the back). Click on either one to bring up the color select dialog box. You use this tool when working with paths. Since this is all about the basics, I won’t go into details. It’s related to the Pen Tool (see below) though. It makes type. Or text. Or whatever you want to call it. You can click a single point, and start typing right away. Or you can click and drag to make a bounding box of where your text/type goes. There’s a lot of options for the Type Tool. Just play around, it’s fairly straight-forward. I mentioned this tool above. It’s for creating paths, in which you would use the Path Selection Tool to select the path. Paths can be used in a few different ways, mostly to create clipping paths, or to create selections. You use the tool by clicking to add a point. If you click and drag, it will change the shape of your path, allowing you to bend and shape the path for accurate selections and such. By default it draws a Shape Layer in the form of a rectangle. It fills the rectangle with whatever foreground color you have selected. It’s pretty complicated, don’t hurt yourself with this one. Like post-it notes, but digital. You can use this tool to add small little note boxes to your image. These are useful if you’re very forgetful or if you’re sharing your Photoshop file with someone else. I’m pretty sure it only works with .PSD files. This tool works by changing your foreground color to whatever color you click on. Holding the [Alt] key will change your background color. You can really make short work of your job with the Hand Tool. It’s for moving your entire image within a window. So if you’re zoomed in and your image area is larger than the window, you can use the Hand Tool to navigate around your image. Just click and drag. You can get to this tool at any time when using any other tool by pressing and holding the [Spacebar]. Pretty obvious what this tool does. It allows you to zoom into your image. Don’t be dumb, it doesn’t actually change the size of your image. Hold the [Alt] key to zoom out. Holding the [Shift] key will zoom all of the windows you have open at the same time. Double-click on the Zoom Tool in the palette to go back to 100% view. These are your color boxes. Foreground (in the front) and Background (in the back). Click on either one to bring up the color select dialog box.
Tools and it's functions
Move Tool (V):
Benefits of Photoshop
This is indeed an advantage for beginners. Since you do not possess the expertise to create great photos, you can use actions. It is easy to learn using actions. You do not need coaching in order to do it. Aside from that, you’ll be glad to see how appealing your photos will look like despite your lack of Photoshop skills.
This is more advantageous for beginners for as you see each action work, you’ll learn more about how Photoshop works. You can even explore and combine the different steps in an action. For sure, your knowledge and skills will be sharpened with what you will discover. If you use actions made by others, do not merely use it but also try to look into the steps and study what he used in creating it. This way, you will know which tool and effect is used to give a good result. This could also help you to make your own Photoshop Action.
If you have about a hundred photos to edit, isn’t it tiring? It is really arduous to edit so many photos. So, instead of repeating the same steps from photo one to the last, you can just record your steps in Actions and it will do the same to the rest. Now, you won’t get tired with the boring work of repeated editing.
As you opt to use an action, you can now apply it to your photos with just one click. Just click play and the changes will immediately apply. Isn’t it remarkable that you can make astonishing photos with just a little time? Actions can really help you a lot and would even encourage you to work more.
You might have browsed the web and found great Photoshop Actions. Download these creative actions and make elegant imagery as a result of combined techniques in just one action. You have saved yourself from editing and applying some effects. Actions have it all done.
Instead of sitting in front of your computer for a long time just to edit a bunch of photos, you’ll have more time to relax. Actions will do the job for you by speeding up the once tiring editing job.
Of course, a simplified job will certainly help you save a lot of time. You can have more time in doing other tasks and you could even nap or take snacks for awhile. You will surely save a lot of time with actions. This will even save you from staring long time at your computer screens doing the thing over and over again.
After seeing your output, you will feel like an expert for it will certainly look like the work of an expert. You’ll get a result the same as the samples you see as an aftermath of a Photoshop Action created by a designer. You can amazingly come up with a work with combined techniques, tones and effects. So, even if you are not really that good in photo manipulation, it will seem like you really are with the magical touch of actions.
Since the steps are recorded and merely played for every photo that you would like to edit, the results will surely be consistent. Unlike doing it manually for every photo, there will surely be differences for every image since you cannot perfectly do it to each and every picture. Actions will give you better results.